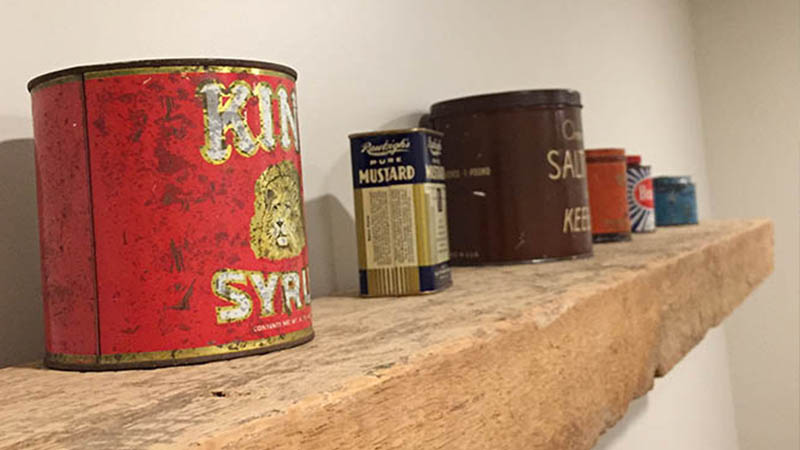
DIY floating shelf project.
Hey! I made a floating shelf, and I wanted to share how I did it. I had purchased this amazing beam from a reclaimed material place near me. It's over 150 years old, and was used on an Amish milk farm in Lancaster, PA. I had originally purchased it to use as a mantle for a fireplace I built, which turned out awesome, but I had a nice piece left over that I didn't want to go to waste.
I recently renovated our basement and the last piece of the renovation was setting an office up down there. The wall above my desk area looked a bit plain, and I have an old tin collection that I wanted to display, so I felt the beam as a floating shelf would work out perfectly.
To start, I knew I wanted the shelf to be roughly 8" deep, but the beam is massive, measuring almost 15" wide, so I had to rip it in half. Being that it's almost 4" thick as well, I had to cut it once from each side with a circular saw to get all the way through.

If you don't have a chalk line, get one, they are super handy for marking long cuts. I recommend Stanley.
Once ripped in half, I spent a little bit of time lightly sanding to clean up some of the edges, but there is so much character in the wood I was careful not to over-sand.


Since I wanted the shelf to appear to be floating, I had to conceal the mounts. I looked around online, but in the end I decided to make my own mounts. I bought two 1/2" threaded floor plates and two 1/2" x 8" lenghts of black pipe. I ended up cutting them shorter, to around 5" with an angle grinder, but I figured longer was better knowing I could always cut them shorter. Here's what they look like assembed before I cut them to length.

So the basic idea for mounting is that these mounts will be attached to the wall into studs, and I'd drill a 7/8" hole in the back of the shelf, and slide it onto the mounts. It sounds straightforward, but if you don't measure perfectly and the holes don't line up, you're in for a real pain of an install. Measure 10 times, and drill the holes once. Also make sure you drill down deep enough to accept the lenght of your mounts. It's fine to go too deep here, as long as you don't drill through the other side.
As mentioned, it's imperative that you adequately anchor the mounts into studs. I would recommend also using hollow wall anchors in the additional holes that don't hit studs.
Here's what the mounts look like attached to the wall and trimmed to length.


Again, make sure you measure perfectly and take your time drilling out the shelf. Also, as a note, keep in mind that when you set the mounts and found studs, that they will likely be offset on the back of your shelf, so ensrue that the shelf is centered on the space, not the mounts. My shelf is about 48" long, and two mounts was adequate. Mark your drill positions, and center them vertically on the back of the shelf. I found that a 7/8" paddle bit was just about the perfect size for the outside diameter of 1/2" black pipe. It's a hair larger, but that wiggle room helps when you hang it. Here's a shot of what the holes look like drilled out of the back of the shelf.

The actual installation of the shelf is probably the hardest part. It's tricky to line the holes up with one person, so I'd recommend bringing a friend. It may be a little tight, which is good, so put some pressure on the shelf and it should slide right onto the mounts. That's it! Now put your favorite things on the shelf. I have a small collection of antique tins, so I finally have a place to put them.


Filed under:
woodworking fun diyFurther Reading
Life, lessons & the pursuit of happiness
DIY floating shelf project.
Dec 11, 2016Hey! I made a floating shelf, and I wanted to share how I did it.
Read moreTaco Ipsum — now every day can be taco tuesday … in your placeholder text.
Mar 4, 2016Because it’s important to have another placeholder text generator in your life, and tacos are tasty.
Read more